Tomcat 7 設置Oracle JNDI
- 事前準備
- Oracle JDBC Driver :放置 Tomcat 安裝的位置,例如:C:\tomcat7\lib
請至Oracle官方網站下載 http://www.oracle.com/technetwork/database/enterprise-edition/jdbc-112010-090769.html
(我是使用Oracle 11g Express 版本)


- 開始設定
一開始以為網路上講修改Tomcat的xml設定檔
是在當初下載回Tomcat的安裝的位置@@"

結果原來不是.....
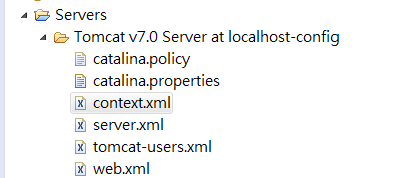
是Eclipse裡面建立的
.png)

我這邊設定的方式是全域的JNDI設定,有三種設定方式,
Step 1) 先設定Tomcat Server的server.xml
加入
<Resource name= "jdbc/oracleDB" auth ="Container"
type= "javax.sql.DataSource"
factory= "org.apache.tomcat.jdbc.pool.DataSourceFactory"
driverClassName="oracle.jdbc.OracleDriver"
url= "jdbc:oracle:thin:@localhost:1521:xe"
username= "username" password ="password"
maxActive="20" maxIdle="10"/>

.png)
這邊還有很多屬性可以設定,
請看
介紹
我這邊首要是能建立連線就好,先隨意設個屬性可以Run成功即可。
Step 2) 再到此server.xml下面一點的地方找尋<Host> ... </Host>,確認裡面有你的專案名稱
我的Create的專案名稱為CDBRS2
加入
<ResourceLink global ="jdbc/oracleDB" name ="jdbc/oracleDB" type="javax.sql.DataSource"/>

===2014.10.8補充===
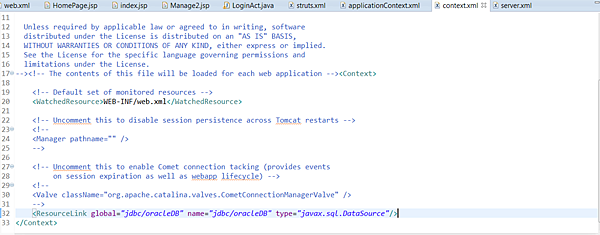
還有Context.xml裡面也要加入才能正常運作...
<ResourceLink global ="jdbc/oracleDB" name ="jdbc/oracleDB" type="javax.sql.DataSource"/>

Step 3) 再到Eclipse Project裡的WEB-INF/web.xml 加入

<!-- Oracle JNDI -->
<resource-ref>
<description> Oracle DB</description >
<res-ref-name> jdbc/oracleDB </res-ref-name>
<res-type> javax.sql.DataSource</res-type >
<res-auth> Container</res-auth >
</resource-ref>

step 4) 因為我有用Springframework,所以設定springframework吃的xml檔

.png)
專案裡面設定是applicationContext.xml為空的

.png)
主要都是寫在datasource.xml

.png)
done~成功連線
文章標籤
全站熱搜


 留言列表
留言列表
